Add a Site to Your Dashboard
As soon as you have added the MainWP Child plugin to your website, you should add that website to your MainWP Dashboard. Adding your website to MainWP Dashboard is easy if you follow these steps to do this:
- Log in to your Dashboard site
- Go to the MainWP > Sites > Add New page
- In the Add a Single Site section:
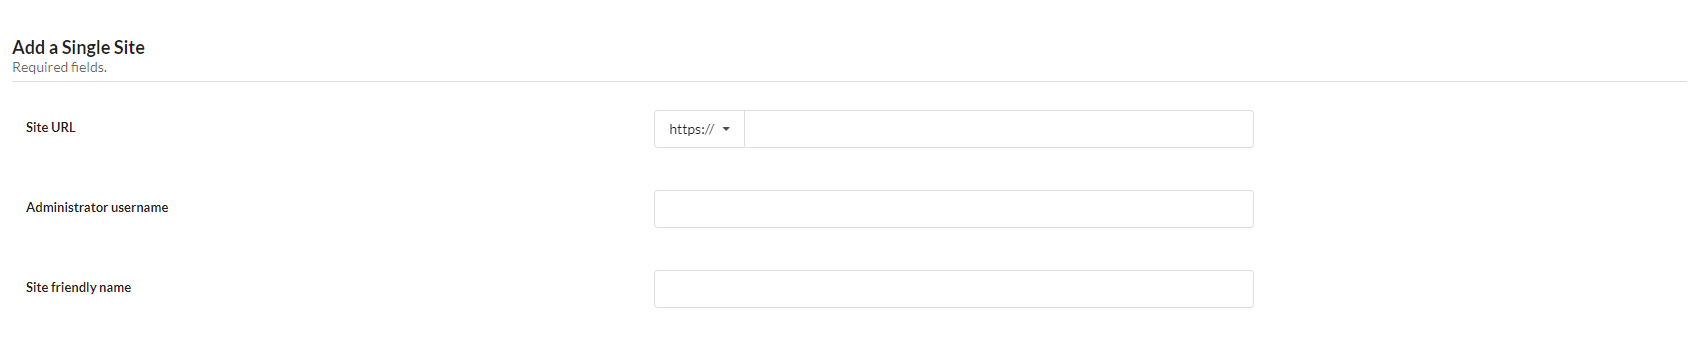
- Enter your website URL
- Enter an Administrator Username of the child site
- Enter your website Friendly Name
- In the Optional Settings section:

- If you have set the Unique Security ID on your website that you are adding to your MainWP Dashboard, enter it in the Unique Security ID field. If you have not set the Unique Security ID on your website, skip this field and leave it blank.
- Add the website to an existing Sites Group or create a new Group for the website
- In the Advanced Options section:

- If your website uses an SSL Certificate, select if you wish your MainWP Dashboard to verify the certificate before connecting the website.
-
If you are using an out of date or self-assigned SSL Certificate and you are having trouble with connecting a Child Site, try to disable the SSL Certificate verification and see if that helps.
If your website doesn’t use an SSL Certificate, skip this field and leave the default value.
- In case your website is protected with the HTTP Basic Authentication, enter your username and password in the HTTP username and HTTP password fields. If you don’t use HTTP Basic Authentication on your website, skip these fields and leave them blank.
- Press the Add New Site button
Extensions Settings Synchronization
If you are using MainWP Extensions that require a third-party plugin to be installed on your website that you are adding to your MainWP Dashboard, additional options will appear in the Add New Site form.
Extensions that require a 3rd party plugin to be installed will allow you to install the plugin and synchronize default extension settings automatically.
Extensions that don’t integrate with any plugin will only allow you to synchronize extension default settings.
Set your preferences and process of adding your site.
Important Notes
If you are experiencing issues with adding a website to your MainWP Dashboard, please use the Test Connection feature to make sure that your MainWP Dashboard can communicate with your website.
Also, you can check the Potential Issues document and see how to resolve them.
If any of these don’t help, do not hesitate to submit a helpdesk ticket!
Import Sites
MainWP Dashboard allows you to import multiple websites. To do this,
- Make sure that the MainWP Child Plugin is installed and activated on your websites
- On your Dashboard Site, go to the MainWP > Sites > Import Sites page
- Download the Sample CSV file
- Open the downloaded file in any text/code editor

- Lines 9 – 13 are demo values that should be replaced. Start replacing it with the actual details of your child sites.
- Enter details in following the order and separate values by comma (,)
- Site URL
- Administrator Username
- Site Friendly Name
- Group name (if you want to add the Child Site to a site group)
- Unique Security ID (if enabled on your website(s))
- HTTP Username (if HTTP Basic Authentication is enabled on your website(s))
- HTTP Password (if HTTP Basic Authentication is enabled on your website(s))
- Verify Certificate ( T – true, F – false)
- SSL Version ( auto – Auto-detection, 1.x, 1, 2, 1.1, 1.2, 1.3)
- Once you are done, save changes in the CSV file
- Upload the CSV file to your MainWP Dashboard
- If the CSV file contains a header (line 8 in the Sample.csv), select the CSV file contains a header option. If you have deleted the header line, you can uncheck the option.
- Click the Import Sites button
Important Notes
MainWP Dashboard requires that file for importing sites is saved in the CSV format. Uploading TXT or any other text format won’t work.
Synchronize a Child Site
Regular synchronization is one of the most important things for successful WordPress Site management. It is essential always to see “fresh” data from your Child Sites.
Global Synchronization
- Login in to your MainWP Dashboard
- In the Header element, click the Sync Dashboard with Child Sites button

Individual Child Site Synchronization
- Login in to your MainWP Dashboard
- Go to the MainWP > Sites > Manage Sites page
- Locate the Child Site that you want to Sync
- Under the actions menu

- Locate the Sync Data action
- Click it
Important Notes
By default, MainWP Plugin will attempt to synchronize your Child Sites once per day. However, it is highly recommended to synchronize data a couple of times per day manually and before performing actions such as Plugin/Them updates, Searching for Posts and Pages,…
Auto Sync feature is the WP Cron driven feature, and it can work only if your WP Cron is triggered regularly.
Edit a Child Site
Along with certain MainWP settings that can be controlled on a child site level, the Child Site Edit page will allow you to update Child Site Name, Administrator User username, assigned groups,…
Access Child Site Edit Page
- Login in to your MainWP Dashboard
- Go to the MainWP > Sites > Manage Sites page
- Locate the Child Site that you want to edit
- Under the actions menu, Locate the Edit action

- Click it
Edit Page Breakdown
General Options
- If you add an SSL certificate on your Child Site after it’s connected to your MainWP Dashboard, you can easily change from HTTP to HTTPS protocol in the Site URL field. Also, in the case the SSL Certificate is removed after establishing the connection, you can change from HTTPS to HTTP.
- If needed, the Administrator Username field will allow you to change the used User.
- Update the child site friendly name in the Site Friendly Name field
- Update groups
- Auto Update Core option will allow you to enable WP Core auto-updates for the Child Site.
- Ignore Core Update option will let you ignore WordPress Core Update for the Child Site.
- Ignore all Plugin Updates; mark all plugin updates as ignored for the Child Site
- Ignore all Theme Updates mark all theme updates as ignored for the Child Site
Advanced Options
- If you change or add the Unique Security ID on your website, update it in the Unique Security ID field.
- If your Child Site starts experiencing issues with an SSL Certificate, you can change the initially set option.
- Update the SSL Version. If you don’t know what is the SSL Version on your website or if there is no SSL Certificate on it, skip this field and leave the Auto Detect value.
- In case you set HTTP Basic Authentication on your website, enter your username and password in the HTTP username and HTTP password fields.
Access Child Site WP Admin
Security Issues
After connecting WordPress websites to your MainWP Dashboard, the MainWP plugin will scan your Child Sites for a couple of known security issues and alert you if there are detected issues.
Issues Searched by The MainWP Plugin
- Directory listing prevention – MainWP Plugin will check if it’s possible to list /wp-content/, /wp-content/plugins/, /wp-content/themes/ and /wp-content/uploads/ directories. After fixing this issue, an empty index.php file will be inserted in each directory in order to prevent listing.
- WordPress version detection – MainWP Plugin will check if it’s possible to detect a version of the WordPress installation. After fixing this issue, the WordPress generator meta tag will be removed from the head sections of the Child Site.
- Really Simple Discovery (RSD) meta tag detection – MainWP Plugin will check if it’s possible to detect the RSD version. After fixing this issue, the RSD meta tag will be removed from the head sections of the Child Site.
- Windows Live Writer meta tag detection – MainWP Plugin will check if it’s possible to detect the WLW version. After fixing this issue, the WLW meta tag will be removed from the head sections of the Child Site.
- Database Error reporting – MainWP Plugin will check if database error reporting is enabled on your Child Site. After fixing this issue, database error reporting will be disabled.
- PHP Error reporting – MainWP Plugin will check if PHP error reporting is enabled on your Child Site. After fixing this issue, PHP error reporting will be disabled.
- readme.html detection – MainWP Plugin will check if the readme.html file exists in the WordPress root directory. After fixing this issue, the MainWP plugin will delete this file. Unifix action is not available after fixing this issue. To unfix it, the file needs to be returned manually.
- “admin” check – MainWP Plugin will check if there is an Administrator user with the “admin” username. This issue is not possible to fix automatically. To fix it, you need to manually delete the user and create a new Administrator user with a different username.

Security Issues Widget
On the MainWP > Overview page, you will be able to find the Security Issues widget, which will alert you if the MainWP Plugin has detected any security issue on your Child Sites.
Also, it will enable you to fix all detected issues quickly.
Security Scan
If you need more details about the detected issues, the Security Scan page in the Individual Child Site mode will provide you the ability to review all security issues and fix the ones that you want.
- Login in to your MainWP Dashboard
- Go to the MainWP > Sites > Manage Sites page
- Locate a Child Site where you want to fix detected Security Issues
- Under the actions menu
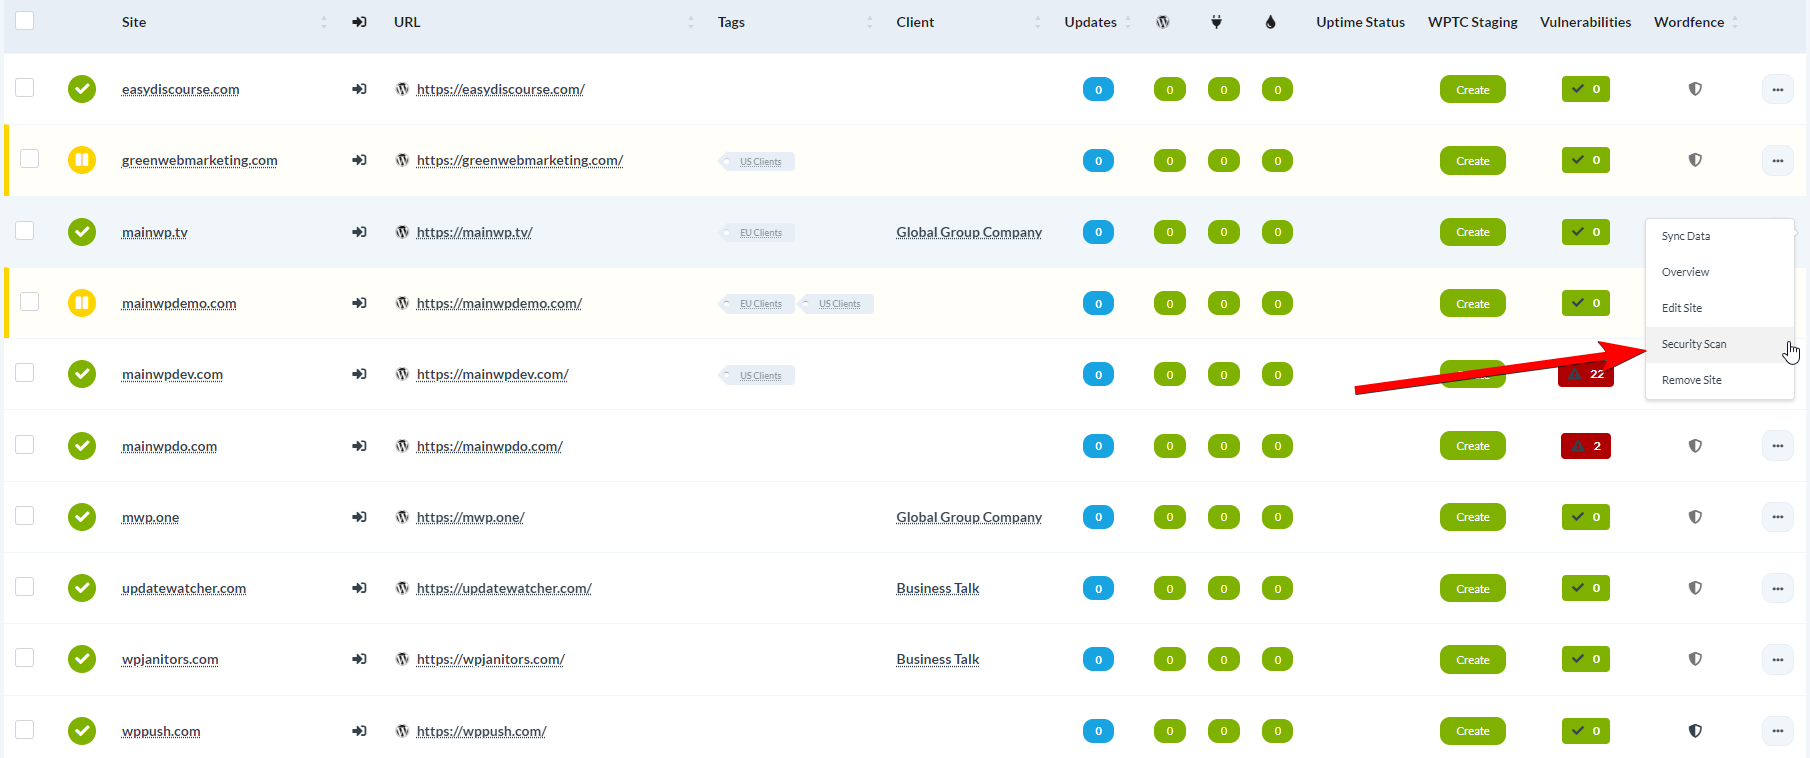
- Locate the Security Scan action
- Click it to access the Security Scan page for the Child Site.
Fixing Issues
- To fix all issues, click the Fix All button under the list
- To fix a single issue, click the Fix action in the corresponding row
- To unfix a single issue, click the Unfix action in the corresponding row
Reconnect a Child Site
If your child site gets disconnected, here is the easiest way to reconnect it:
Single Site Reconnection
- Login in to your MainWP Dashboard
- Go to the MainWP > Sites > Manage Sites page
- Locate the Disconnected site
- In the actions menu, click the Reconnect action
Reconnect Sites in Bulk
- Login in to your MainWP Dashboard
- Go to the MainWP > Sites > Manage Sites page
- Select all disconnected sites by checking the checkbox in front of the site row
- Select the Reconnect action in the Bulk Actions dropdown menu
- Click the Apply button
Delete a Child Site
If you stop managing one or multiple Child Sites, here is the easiest way to disconnect them from your MainWP Dashboard:
Delete a Single Site
- Login in to your MainWP Dashboard
- Go to the MainWP > Sites > Manage Sites page
- Locate the site that you want to delete
- In the actions menu, click the Remove Site action
Delete Multiple Sites at Once
- Login in to your MainWP Dashboard
- Go to the MainWP > Sites > Manage Sites page
- Select all sites you want to delete by checking the checkbox in front of the site row
- Select the Remove action in the Bulk Actions dropdown menu
- Click the Apply button
Important Notes:
If a Child Site is properly connected to your MainWP Dashboard, after deleting it, the MainWP plugin will automatically deactivate the MainWP Child plugin on the Child Site.
If a Child Site is not properly connected to your MainWP Dashboard, MainWP Plugin won’t be able to deactivate the plugin, and it is highly recommended to go to the Child Site as soon as possible and manually deactivate the MainWP Child plugin.
Manage Child Site Notes
MainWP Plugin allows you to keep notes for all your Child Sites.
Create a New Note
- Login in to your MainWP Dashboard
- Go to the MainWP > Sites > Manage Sites page
- Locate wanted Child Sites
- Click the Note icon in the Notes column
- After the Notes modal window opens
- Click the Edit button
- Add note content
- Click the Save note button
View Notes
To view notes, you can follow the same process as adding notes; however, you can also view your notes in the Notes widget in the Individual Child Site Dashboard.
Manage Child Site Tags
Note: Since version 4.3 of MainWP Dashboard, Groups have been renamed to Tags. However, the functionality is unchanged, and this help document applies to older versions of the MainWP Dashboard as well.
In case you are managing a large number of WordPress sites, it would be very useful for you to split sites into different groups by applying Tags to them. Later, you will be able to make Site Selection by a tag to speed up your work and makes it much easier.
Multiple tags can be applied to any child site at a time.
Create a New Tag
- Login to your MainWP Dashboard
- Go to the MainWP > Sites > Tags page
- Click the New Tag button

- Enter a Tag Name in the provided field

- Click the Create Tag button
- Click the name of the Tag on the right
- Select all sites that you want to add to this Tag
- Click the Save Selection button
Edit a Tag
- Login to your MainWP Dashboard
- Go to the MainWP > Sites > Tags page
- Find the Tag that you want to edit and click on the name of the Tag
- Add/Remove sites
- Click the Save Selection button
Delete a Tag
-
- Login to your MainWP Dashboard
- Go to the MainWP > Sites > Tag page
- Locate the Tag that you want to delete
- Click the Trash icon next to the Tag name

Sites Monitoring
Since version 4.1, the MainWP Dashboard plugin provides basic site monitoring features. This includes basic uptime monitoring and Site Health monitoring.
Basic Uptime Monitoring
Depending on the selected frequency (from 5-minutely to once daily), your MainWP Dashboard will send a simple HTTP request (via cURL) to get an HTTP Header response from the site. If your child site doesn’t return Status Code 200 (OK), your MainWP Dashboard will notify you immediately via email notification. Since it is a custom cURL request, this feature doesn’t rely on any 3rd-party service, such as Uptime Robot or anything similar. In other words, this feature enables you to monitor your sites for free, regardless of the number of child sites that you manage.
To set your MainWP Dashboard to automatically checks your child sites,

- Go to the MainWP > Settings page.
- Make sure that the Basic Uptime Monitoring is enabled
- Set the check frequency
- Save Settings
Site Health Monitoring
WordPress 5.1 introduced Site Health, which is a suite of features focused on website security and speed. MainWP Site Health Monitoring feature allows you to set if you want to be notified about your child sites Health status or only if it goes under the status Good.
To set your MainWP Dashboard to automatically checks your child sites,

- Go to the MainWP > Settings page.
- Make sure that the Site Health Monitoring is enabled
- Set the Threshold
- Save Settings
Individual Site Settings
It is possible to set different checking intervals for each child individually, Site Health threshold, or even disable monitoring. Also, it’s possible to add additional email addresses (comma separated). Individual site settings can be found on the site Edit page.
Manually Check Sites
The Monitoring feature allows you to perform checks whenever you want. To do that,
- Go to the MainWP > Sites > Monitoring page
- If you want to check a single site, click the Check Now action from the Actions menu.
- Or, if you want to check multiple sites, select wanted sites and use the Check Now action from the Bulk Actions menu.